Welcome to the Oster 22 Quart Roaster Oven Manual‚ your comprehensive guide to mastering this versatile kitchen appliance. Designed for efficient cooking‚ this manual covers essential features‚ safety tips‚ and usage instructions. Explore its capabilities‚ from roasting meats to baking desserts‚ and discover how to optimize performance. The manual is available as a downloadable PDF from Oster’s official website or trusted sources like the Internet Archive.
1.1 Overview of the Oster 22 Quart Roaster Oven
The Oster 22 Quart Roaster Oven is a versatile and spacious electric roasting oven designed for efficient cooking. With its large 22-quart capacity‚ it can accommodate whole turkeys‚ roasts‚ or multiple dishes at once. The oven features a self-basting lid‚ which ensures even moisture distribution for tender results. Its compact design makes it ideal for countertops‚ while its portability allows for easy transport. Perfect for roasting‚ baking‚ or slow cooking‚ this oven is a practical addition to any kitchen. The user-friendly interface and durable construction ensure long-lasting performance. Whether for family meals or special occasions‚ the Oster 22 Quart Roaster Oven delivers consistent‚ delicious results.
1.2 Importance of Reading the Manual
Reading the Oster 22 Quart Roaster Oven manual is essential for safe and effective use of the appliance. It provides critical safety information‚ operating instructions‚ and troubleshooting tips. Understanding the manual ensures proper assembly‚ temperature control‚ and maintenance. It also highlights features like the self-basting lid and optimal cooking techniques. By following the guidelines‚ users can prevent accidents‚ achieve consistent results‚ and extend the appliance’s lifespan. The manual also includes warranty details and customer support information‚ making it a vital resource for addressing any issues. Taking the time to review the manual will help you maximize the oven’s performance and enjoy a satisfying cooking experience.

Safety Precautions and Guidelines
Always follow safety guidelines to ensure safe operation of the Oster 22 Quart Roaster Oven. Avoid improper use and handle hot components with oven mitts. General safety tips‚ electrical considerations‚ and proper handling and storage are essential to prevent accidents and maintain performance.
2.1 General Safety Tips
For safe operation‚ always place the Oster 22 Quart Roaster Oven on a heat-resistant surface‚ away from flammable materials. Keep children away during use. Never touch hot surfaces; use oven mitts or tongs. Avoid overheating by following recommended temperature settings. Do not leave the appliance unattended while in operation. Ensure proper ventilation to prevent steam buildup. Avoid using abrasive cleaners or metal utensils that may damage the finish. Regularly inspect cords and plugs for damage. Never submerge electrical components in water. Always follow the manual’s guidelines for safe usage and maintenance to ensure longevity and performance of the roaster oven.
2.2 Electrical Safety Considerations
Always ensure the Oster 22 Quart Roaster Oven is plugged into a grounded electrical outlet rated for 120V AC. Avoid using extension cords or overloaded circuits; Keep the power cord away from hot surfaces or water to prevent damage. Never submerge electrical components in water or expose them to excessive moisture. If the cord is damaged‚ stop using the appliance immediately. Avoid touching electrical parts with wet hands. Use a surge protector to safeguard against power surges. Never operate the roaster oven near water sources or in humid environments. Properly store the cord when not in use to avoid tripping hazards or damage.
2.3 Handling and Storage Safety
Always handle the Oster 22 Quart Roaster Oven with care to avoid burns or damage. Use oven mitts or tongs when moving hot components. Place the roaster on a heat-resistant surface‚ ensuring it is stable and level. When storing‚ clean the appliance thoroughly to prevent bacteria growth or odors. Store the roaster in a dry‚ secure location‚ away from children and pets. Avoid stacking heavy objects on top of the roaster oven. If storing for extended periods‚ keep it in an upright position to save space and maintain balance. Never store the appliance near flammable materials or in humid environments‚ as this could damage electrical components or promote rust.

Product Assembly and Initial Setup
Ensure all parts are included and undamaged. Clean the roaster thoroughly before first use. Assemble components as per the manual’s instructions for safe and proper setup.
3.1 Unboxing and Inventory of Parts
Start by carefully opening the box and inspecting all components. Ensure the roaster oven‚ lid‚ rack‚ drip pan‚ and accessories are included. Compare the parts with the manual’s list to confirm nothing is missing. Check each item for visible damage or defects. If any part is damaged‚ contact customer support immediately. Organize the components on a clean surface for easy access during assembly. Keep the packaging materials for future storage or transport. Familiarize yourself with each part’s purpose before proceeding to ensure a smooth setup process. Proper inventory ensures all necessary items are accounted for‚ preventing delays during assembly.
3.2 Initial Cleaning and Preparation
Before first use‚ wash the rack‚ drip pan‚ and any removable parts with mild soap and warm water. Rinse thoroughly and dry with a clean towel. Wipe the exterior and interior of the roaster oven with a damp cloth to remove any manufacturing residue. Avoid using abrasive cleaners or scrubbers to prevent damage. Ensure all parts are completely dry to prevent rust or water spots. Plug in the oven and run it empty at 300°F (150°C) for 30 minutes to burn off any factory coatings. This step ensures your roaster oven is clean‚ sanitized‚ and ready for its first use.
3.3 Assembling the Roaster Oven
Begin by placing the roaster oven on a stable‚ heat-resistant surface. Carefully unpack all components‚ ensuring no parts are damaged. First‚ insert the cooking rack into the roaster pan‚ aligning the handles for easy access. Next‚ place the pan into the roaster oven‚ ensuring it fits snugly into the base. Attach the lid by aligning the hinges with the corresponding hooks on the oven. Secure the lid handle tightly to ensure proper closure. If your model includes additional features like a timer or temperature probe‚ refer to the manual for specific installation instructions. Double-check all connections to ensure everything is properly assembled before use.
Operating the Oster 22 Quart Roaster Oven
Operating the Oster 22 Quart Roaster Oven is straightforward. Set the temperature and timer using the easy-to-use control panel. The self-basting lid ensures even cooking.
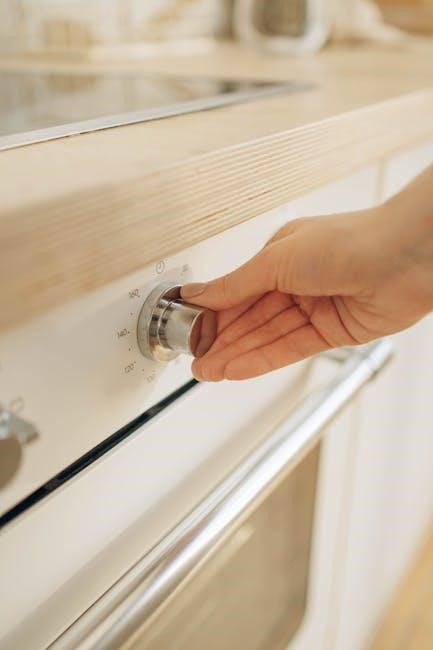
4.1 Understanding the Control Panel
The control panel of the Oster 22 Quart Roaster Oven is designed for intuitive operation. It features a digital display‚ temperature control buttons‚ and a timer. The panel includes buttons for setting the cooking mode (roast‚ bake‚ slow cook) and adjusting heat levels. An LED display shows the current temperature and timer countdown. The panel also has indicator lights to signal when the oven is preheated or in operation. Familiarizing yourself with these components ensures precise control over your cooking process. Always refer to the manual for specific button functions and operation guidelines to use the oven safely and effectively.
4.2 Setting the Temperature and Timer
To set the temperature on the Oster 22 Quart Roaster Oven‚ use the digital controls to select your desired heat level within the range of 150°F to 450°F. Press the temperature increase or decrease buttons until the display shows your preferred setting. For the timer‚ enter the cooking duration using the numeric keypad or the timer-specific buttons. The timer can be set up to 24 hours in advance. Once both temperature and timer are set‚ press the start button to begin the cooking cycle. The oven will automatically turn off when the timer expires. Always ensure the settings match your recipe for optimal results.
4.3 Using the Self-Basting Lid
The self-basting lid of the Oster 22 Quart Roaster Oven is designed to evenly distribute moisture and heat during cooking. To use it effectively‚ ensure the lid is properly aligned and securely locked onto the roaster. This feature minimizes the need for manual basting‚ allowing for consistent results. For optimal performance‚ place the lid with the basting channels facing downward. Avoid opening the lid too frequently‚ as this can release valuable steam and heat. Cleaning the lid regularly is essential to maintain its functionality. The self-basting lid is a key feature that enhances cooking efficiency and ensures tender‚ flavorful dishes every time.

Cooking Techniques and Best Practices
Master essential cooking techniques for optimal results. Ensure even browning‚ manage cooking times‚ and use marinades for enhanced flavor. Adjust temperatures for different meats and vegetables.
5.1 Basic Cooking Guidelines
Start by preheating the oven to the desired temperature before adding food. Always place food in a single layer for even cooking. Use the self-basting lid to retain moisture and flavor. Avoid overcrowding‚ as this can affect air circulation and cooking efficiency. For roasting‚ pat dry meats and vegetables to ensure crispy results. Baste occasionally if needed‚ but the lid’s design minimizes the need for frequent interference. Monitor cooking times and temperatures‚ adjusting as necessary. Keep an eye on smaller items like vegetables to prevent overcooking. Use the timer function for precise control‚ and let meats rest before serving for optimal juiciness.
5.2 Roasting Meat: Tips and Tricks
For perfect roasts‚ season meats generously with spices‚ herbs‚ and marinades before cooking. Use the self-basting lid to maintain moisture and flavor. Roast at higher temperatures (325°F–375°F) for crispy exteriors and juicy interiors. Place larger cuts like turkey or beef on the rack for even cooking. Tent with foil if browning too quickly. Baste occasionally‚ especially for fatty meats‚ to enhance flavor. Let meat rest 15–20 minutes before carving to retain juices. Use a meat thermometer to ensure internal temperatures meet safety guidelines. Avoid overcrowding the pan to allow air to circulate evenly. Experiment with aromatic vegetables like onions and carrots in the pan for added depth of flavor;
5.3 Cooking Vegetables and Sides
Cooking vegetables and sides in the Oster 22 Quart Roaster Oven is effortless and flavorful. Cut vegetables evenly for consistent cooking. Toss with oil‚ seasonings‚ or butter for enhanced taste. Roast at 375°F for 20–40 minutes‚ depending on the vegetable. Root vegetables like potatoes and carrots roast beautifully‚ while softer options like Brussels sprouts and broccoli benefit from shorter times. Use the rack for air circulation and to prevent steaming. Cover with foil if vegetables brown too quickly. Add aromatic herbs or garlic for extra flavor. For sides‚ try roasting potatoes with rosemary or caramelizing root vegetables. Toss halfway through cooking for even browning and crispy textures.

Recipe Ideas and Meal Planning
Cook a variety of delicious meals with the Oster 22 Quart Roaster Oven‚ from hearty roasts to flavorful sides. Explore diverse recipes and meal planning ideas with ease.
6.1 Delicious Roasted Turkey Recipe
Prepare a mouthwatering roasted turkey using the Oster 22 Quart Roaster Oven. Preheat to 325°F (160°C). Season a 12-14 lb turkey with salt‚ pepper‚ and herbs. Place in the roaster‚ breast side up. Use the self-basting lid to ensure even moisture. Roast for about 3-3.5 hours‚ or until the internal temperature reaches 165°F. Baste occasionally for crispy skin. Let rest for 30 minutes before carving. Serve with your favorite sides for a perfect holiday meal. Ensure the turkey is completely thawed before cooking for even roasting. Use a meat thermometer to check doneness accurately.
- Preheat the oven to 325°F.
- Season the turkey generously.
- Cook until golden and juicy.
- Let rest before serving.
6.2 Perfect Roasted Chicken Instructions
Achieve a perfectly roasted chicken using the Oster 22 Quart Roaster Oven. Preheat to 375°F (190°C). Rinse and pat dry a 4-6 lb chicken. Rub with olive oil and season with salt‚ pepper‚ paprika‚ garlic powder‚ and herbs. Place in the roaster‚ breast side up. Use the self-basting lid for even cooking. Roast for 45-50 minutes per pound‚ or until the internal temperature reaches 165°F. Let rest for 10-15 minutes before carving. For crispy skin‚ baste with pan juices halfway through cooking. This method ensures juicy meat and flavorful results every time.
- Preheat the oven to 375°F.
- Season the chicken generously.
- Roast until golden and fully cooked.
- Let rest before serving.
6.3 Vegetable Medley Cooking Guide
Cooking a vibrant vegetable medley in the Oster 22 Quart Roaster Oven is simple and delicious. Toss your favorite vegetables (e.g.‚ carrots‚ potatoes‚ Brussels sprouts‚ and red bell peppers) with olive oil‚ salt‚ pepper‚ and herbs like rosemary or thyme. Preheat the oven to 425°F (220°C). Spread the vegetables in a single layer in the roaster pan for even cooking. Roast for 25-35 minutes‚ stirring halfway‚ until tender and caramelized. Use the self-basting lid to retain moisture and enhance flavor. For added crispiness‚ increase the temperature to 450°F (230°C) for the last 5 minutes. Serve as a healthy‚ flavorful side dish.
- Preheat the oven to 425°F.
- Toss vegetables with oil and seasonings.
- Roast until tender and golden brown.
- Stir halfway for even cooking.

Maintenance and Cleaning
Regular cleaning and maintenance ensure optimal performance and longevity of your Oster 22 Quart Roaster Oven. Always unplug it before cleaning and avoid using abrasive materials.
- Clean the oven after each use to prevent food buildup.
- Dry thoroughly to avoid moisture damage.
- Store properly when not in use.
7.1 Cleaning the Roaster Oven
Cleaning the Oster 22 Quart Roaster Oven is essential for maintaining its performance and hygiene. Always unplug the oven before cleaning.
- Wipe the exterior with a damp cloth and mild soap to remove splatters and fingerprints.
- For the interior‚ remove racks and pans‚ and wash them with warm soapy water; Avoid using abrasive cleaners or metal scourers.
- Soak stubborn food residue in warm water before scrubbing gently with a soft sponge.
- Dry all parts thoroughly to prevent rust and water spots.
- Regularly clean the lid and sealing gasket to ensure proper closure and even cooking.
Regular cleaning prevents food buildup and ensures your roaster oven remains in great condition for years.
7.2 Storing the Appliance
Proper storage of the Oster 22 Quart Roaster Oven ensures longevity and safety. After cleaning‚ store it in a dry‚ cool place away from direct sunlight and moisture.
- Place the roaster oven on a stable surface or in its original box for protection.
- Use a breathable cover or cloth to prevent dust buildup while allowing airflow.
- Avoid stacking heavy items on top of the appliance to prevent damage.
- Store the power cord separately‚ coiled neatly to avoid tangling or damage.
- Ensure all parts are completely dry before storage to prevent mold or rust.
Regular inspection before and after storage ensures the appliance remains in excellent condition for future use.
7.3 Regular Maintenance Tips
Regular maintenance ensures the Oster 22 Quart Roaster Oven performs optimally and lasts longer. After each use‚ clean the interior thoroughly to prevent food residue buildup.
- Check the power cord and plug for damage; replace if worn or frayed.
- Lubricate the hinges and lid mechanism periodically to ensure smooth operation.
- Inspect the heating elements for food splatters and clean them gently with a damp cloth.
- Verify the accuracy of the temperature control by using an oven thermometer.
- Ensure the appliance is cool before wiping down exterior surfaces with a soft‚ damp cloth.
By following these maintenance tips‚ you can ensure reliable performance and extend the lifespan of your roaster oven.

Troubleshooting Common Issues
Troubleshooting helps resolve issues like uneven cooking or malfunctioning controls. Check power supply‚ ensure proper assembly‚ and clean sensors regularly for optimal performance.
- Appliance not heating? Verify temperature settings and plug connection.
- Timer issues? Reset and ensure correct timer dial alignment.
- Excessive smoke? Reduce fat content or lower cooking temperature.
8.1 Identifying and Solving Common Problems
Identify common issues with your Oster 22 Quart Roaster Oven‚ such as uneven cooking or malfunctioning controls. Solve these by checking power supply‚ ensuring proper assembly‚ and cleaning sensors.
- Not heating? Verify the power cord connection and ensure the outlet works. Check the temperature dial for proper setting.
- Timer issues? Reset the timer and ensure it’s aligned correctly. If it still malfunctions‚ consult the manual or contact support.
- Excessive smoke? Reduce fat content in food or lower the cooking temperature to minimize smoke production.
- Food not browning? Ensure the self-basting lid is clean and functioning properly. Adjust cooking time for better results.
Regular maintenance and proper usage can prevent many of these issues‚ ensuring optimal performance and longevity of your roaster oven.
8.2 Error Codes and Solutions
Understand and resolve error codes on your Oster 22 Quart Roaster Oven. These codes help diagnose issues quickly.
- E1: Indicates a temperature sensor malfunction. Unplug‚ let cool‚ then plug back in. If persistent‚ contact support.
- E2: Timer malfunction. Reset the appliance by unplugging it for 30 seconds. If unresolved‚ refer to the manual.
- E3: Power supply issue. Check the cord and ensure the outlet is functioning. Avoid using extension cords.
- E4: Self-basting lid malfunction. Clean the lid and ensure proper alignment. Lubricate hinges if stuck.
Addressing error codes promptly ensures smooth operation and prevents further complications. Always refer to the manual for detailed solutions.
8.3 Resetting the Appliance
To reset the Oster 22 Quart Roaster Oven‚ unplug it from the power source and wait 30 seconds. This allows the internal systems to reset. Plug it back in and test its functionality. If issues persist‚ press and hold the “Cancel” button while plugging it back in to force a factory reset. After resetting‚ ensure all settings are reconfigured. If problems continue‚ refer to the troubleshooting section or contact customer support. Regular resets can help maintain optimal performance and resolve software-related issues. Always follow the manual’s instructions for resetting to avoid complications.
Warranty and Customer Support
The Oster 22 Quart Roaster Oven is backed by a limited one-year warranty covering defects in materials and workmanship. For inquiries or assistance‚ contact customer support via phone or the official website.
9.1 Understanding the Warranty Policy
The Oster 22 Quart Roaster Oven is covered by a limited one-year warranty from the date of purchase. This warranty protects against defects in materials and workmanship under normal use. It applies only to the original purchaser and is non-transferable. The warranty covers repairs or replacements at no cost‚ but it does not include damage caused by misuse‚ accidents‚ or normal wear and tear. Accessories and commercial use are excluded. To make a warranty claim‚ you must provide proof of purchase and contact customer support. The warranty does not cover consequential damages or shipping costs. Specific terms may vary by region.
9.2 Contacting Customer Support
To contact Oster customer support for inquiries or assistance with your 22 Quart Roaster Oven‚ visit their official website or call their customer service hotline. The website provides a “Contact Us” section with a form for submitting questions or concerns. You can also reach them by phone at the number listed on their website. For faster assistance‚ have your product model number and purchase details ready. Additionally‚ the website offers FAQs and downloadable resources‚ such as manuals and troubleshooting guides. Customer support is available Monday through Friday during business hours. Be sure to check the website for holiday hours or extended support options;
9.3 Returning or Replacing the Product
To return or replace your Oster 22 Quart Roaster Oven‚ review the warranty terms and conditions. If your product is defective or damaged‚ contact customer support to initiate the process. You may need to provide proof of purchase and a detailed description of the issue. Once approved‚ you’ll receive a Return Merchandise Authorization (RMA) number. Carefully package the product‚ including all original parts‚ and ship it to the address provided. Allow 7-10 business days for processing. Refunds or replacements are issued based on the warranty policy. For non-defective returns‚ ensure the product is in like-new condition to avoid restocking fees. Check the website for specific return shipping labels and procedures.

User Reviews and Feedback
Users praise the Oster 22 Quart Roaster Oven for its large capacity and even cooking. Many highlight its versatility for roasting meats and vegetables. Some note the self-basting lid enhances moisture retention‚ while others appreciate the easy cleanup. A few mention minor issues with non-stick coating durability. Overall‚ it’s a popular choice for family meals and special occasions‚ offering good value for its price. Common feedback emphasizes its reliability and performance‚ making it a favorite among home cooks. Proper maintenance and care are key to extending its lifespan and maintaining optimal functionality.
10.1 Customer Satisfaction and Ratings
Customers have expressed high satisfaction with the Oster 22 Quart Roaster Oven‚ with many praising its performance and versatility. On platforms like Amazon‚ it often receives an average rating of 4.5 out of 5 stars. Buyers frequently highlight its large capacity‚ ease of use‚ and ability to cook evenly. The self-basting lid is a favorite feature‚ as it ensures moist and flavorful results. Some users have noted minor issues with the non-stick coating over time‚ but these are overshadowed by the oven’s overall reliability. The majority agree it’s a great value for the price‚ making it a popular choice for home cooks seeking efficient and delicious meal preparation.
10.2 Common User Complaints and Solutions
While the Oster 22 Quart Roaster Oven is well-received‚ some users have reported minor issues. A common complaint is the non-stick coating peeling off over time‚ which can be mitigated by avoiding metal utensils and abrasive cleaners. Others mention the lid not sealing tightly‚ but this often resolves by ensuring proper alignment and cleaning the gasket. A few users note the timer’s inaccuracy‚ which can be addressed by using an external timer for precise cooking. Despite these concerns‚ most users find the oven reliable and durable with proper care. Addressing these issues can enhance the overall cooking experience.
10.3 Tips from Experienced Users
Experienced users recommend preheating the oven for 10-15 minutes before cooking for even heat distribution. Always pat dry meats and vegetables to enhance browning and prevent steam buildup. For crispy results‚ avoid overcrowding the roasting pan. Season foods generously‚ as the roasting process intensifies flavors. Use the self-basting lid to retain moisture‚ but ensure it’s clean to avoid dripping onto the heating element. Place the oven on a heat-resistant surface to protect countertops. For large roasts‚ cook at lower temperatures (300-325°F) to prevent burning. Experiment with marinades and spices for unique flavor profiles. These tips enhance cooking efficiency and overall satisfaction with the Oster 22 Quart Roaster Oven.